Flutter & Shaders — An initial look

Introduction
Flutter has been growing over the last few years and different communities have been popping up around Flutter at the same time. One of those communities is Flame, a game engine written on top of Flutter. As a core maintainer of Flame I am quite involved with the community and I often answer questions that people have that are related to GameDev in Flutter with (or without) Flame. Normally we can answer these questions quite easily but there is one question in particular that I never was able to give a satisfying answer to.
Will there be shader support for Flutter/Flame?
- the Flame community
“But Flutter is already working on shader support, aren’t they”, is what I hear you say, and yes, you are completely right. In June of 2021 I even did a quick overview on Twitter about what the Flutter team (or to be exact Christopher Crawford) has done thus far:
However, at the time, the shader support was not useable and I sadly could not get it to work. But the question (or rather questions) that I had surrounding this subject were still unanswered. Will there be support? How will it work? Will it be fully integrated into the Flutter build pipelines? I don’t know, do you?
And that is why I have decided to look at it once again and get a running Flutter application that uses a shader to visualise something on-screen!
Where do I start?
Because of the research I did in June of 2021 I had already found some “documentation” related to the subject so I decided to read through those again and also check out any comments that were made. For the sake of sharing knowledge I will link the documentation here as well:
- https://github.com/flutter/flutter/issues/58361
- https://docs.google.com/document/d/1z9K5LernwQ0LVAzfbAMW6ITx63QRdRsoax1NLYEfm4Y
Based on those links I was able to deduce a few things that I needed to do and to set up to make it all work. First I needed to be on the master branch of the Flutter Engine as that had the up to date experimental shader code. I also needed to get some GLSL shaders ready that I could use in my application and finally I needed a way to compile GLSL shaders to a SPIR-V binary. SPIR-V is a standard developed by the Khronos Group and is a cross-API (OpenGL, Vulkan, etc..) graphics language.
The first one wasn’t very difficult as I was already familiar with GLSL but I can highly recommend https://thebookofshaders.com/ if you are not yet familiar with GLSL or shaders in general.
The Flutter Engine also comes with some shaders for testing purposes, these shaders are quite useful to get insights into what uniforms are supported right now.
Switching to master
Switching to the master branch was easily done by running the following command:
flutter channel master
flutter upgrade
If you use FVM you can also run the following command in your project directory:
fvm use masterAfter switching I decided to create my project so I ran the flutter create command:
flutter create ./flutter_shader_testGetting some GLSL shaders ready
For the initial setup I decided to just use the simple.glsl shader from the Flutter Engine repo:
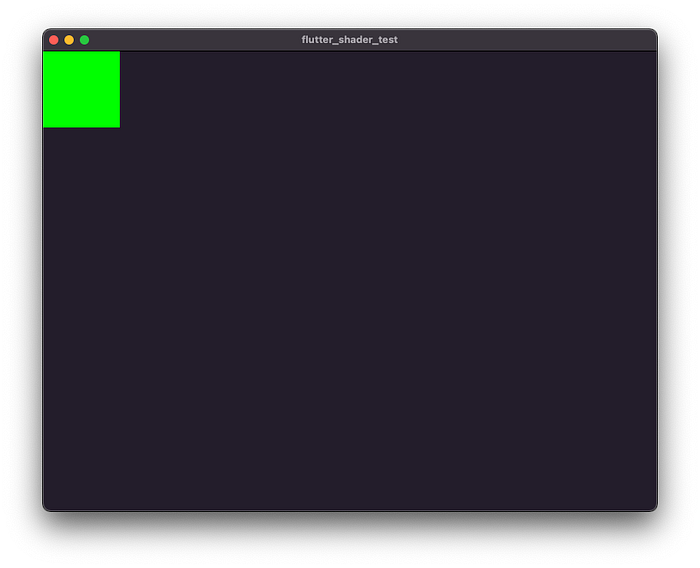
This shader basically sets the fragColor to a greenish color depending on the input value a.
I created a shaders directory within the newly created Flutter project and saved the file there as simple.glsl.
Compiling to a SPV binary
Sadly I could not find any clear instructions on how to compile a GLSL shader to a SPIR-V binary nor was there any mention of tooling I could use. Thankfully I am blessed with some googling skills and a decent brain. By combining these two assets of mine I was able to figure out that I could use something like glslc, which is a wrapper around gslangValidator who despite its name does not validate but also generates, to compile my GLSL shader to a SPIR-V binary! This tool is part of the shaderc repo, it provides tools and libraries for the Vulkan shader compilation. Vulkan is a rendering API that Skia (the rendering engine that Flutter uses) is built upon.
Okay so glslc, awesome right? Well yes and no. Because my next problem was getting that tool installed. After checking out the repository a bit more I eventually found a download link for the latest version of the tools: https://github.com/google/shaderc/blob/main/downloads.md.
So I downloaded the right assets for my platform (macOS in this case), decompressed the .tgz file and stored all the data inside the ./third_party/shaderc directory of my project.
Running and compiling Shaders in Flutter
With the right tooling installed, GLSL shaders ready to go and using the right channel for the Flutter engine I could finally start testing out the new shader features.
Compiling my simple shader
So, step one is figuring out how to compile the GLSL shader into a SPIR-V binary. Thankfully, while I was researching glslc, I already found out how the tool worked and what parameters I had to use. I created a assets/shaders directory so I could store the compiled shaders there.
Compiling the shader is as “simple” as running:
Let me give you a quick rundown of the different parts of this command:
./third_party/shaderc/bin/glslcis the tool itself.--target-env=openglstates that we want it to be compatible with OpenGL.-fshader-stage=fragmentstates that the shader we are passing is a fragment shader, compiling other type of shaders like a vert or vertex shader is supported by this tool but Flutter does not yet support them.-o assets/shader/simple.sprvis the output of the SPIR-V binary.shader/simple.glslis the input file, the shader we want to compile.
Running this command compiles our shader into a SPIR-V binary, I added this freshly compiled binary to my assets in the pubspec.yaml:
Using the GLSL shader
Now that we have a shader that we can use in Flutter it is time to write some dart code!
First things first, we need to setup a FragmentProgram, it basically is a factory class that can compile our SPIR-V binary into a fragment program. Using that program we can then create different instances of our shader with different input values.
The floatUniforms parameter describes the input values for your shader, so if you have multiple uniforms of different types then you have to pass the values in as floats in the correct order.
For instance if we have a uniform float a at location = 0 and a uniform vec2 b at location = 1 then our floatUniforms should look like this:
// a: 1
// b: [2, 3]
floatUniforms: Float32List.fromList([1, 2, 3])
After we have set up the shader we pass it to our FlutterShaderTest, that just acts as a Widget class for the CustomPainter that we are going to define:
The ShaderPainter is a simple CustomPainter that sets up a Paint instance with the given shader attached. It then renders that to the canvas to visualise the Shader code:
With these classes defined we can now run our Flutter application and see the end result, which should be a green square of 100 by 100 pixels:
What’s next?
Now that we know how to compile shaders and pass arguments to them in Flutter we can mess around with different shaders and get some shader magic going! But I won’t do that in this article, I will mess around with it some more on a later date and probably write a follow-up article about my findings and what kind of funky and interesting things we can do with shaders!
Thanks for going on this adventure with me and I hope you learned something, I know I did ;-).
The source code for this project can be found here: https://github.com/wolfenrain/flutter_shader_test